1 http!!!
查看web服务过程
wget –debug www.baidu.com
curl -v www.baidu.com
1.1 请求

| 请求起始行 | 请求方法(get/post) URI http版本(1.1/2.0) |
|---|---|
| 请求头 | UA头客户端代理(用什么工具访问网站) Host头表示访问的目标网站:域名或ip |
| body | 一般post请求中有 |
1.2 响应

| 响应 | |
| | – |
| server | nginx/apache web服务器 |
| Via: | 判断是否经过CDN |
状态码

2 nginx服务!!!
2.1 配置yum源安装
 cat >/etc/yum.repos.d/nginx.repo <<EOF
[nginx-stable]
name=nginx stable repo
baseurl=http://nginx.org/packages/centos/7/$basearch/
gpgcheck=1
enabled=1
gpgkey=https://nginx.org/keys/nginx_signing.key
module_hotfixes=true
EOF
yum install -y nginx
2.2 本地测试
curl -H Host:bird.cmy.cn http://10.168.10.107
2.3 配置文件

/etc/nginx/nginx.conf
user  nginx;
worker_processes  auto;

error_log  /var/log/nginx/error.log notice;
pid        /var/run/nginx.pid;


events {
    worker_connections  1024;
}


http {
    include       /etc/nginx/mime.types;
    default_type  application/octet-stream;

    log_format  main  '$remote_addr - $remote_user [$time_local] "$request" '
                      '$status $body_bytes_sent "$http_referer" '
                      '"$http_user_agent" "$http_x_forwarded_for"';

    access_log  /var/log/nginx/access.log  main;

    sendfile        on;
    #tcp_nopush     on;

    keepalive_timeout  65;

    #gzip  on;

    include /etc/nginx/conf.d/*.conf;
}


子配置文件


server {
  listen 80;
  charset UTF-8;
  server_name bird.cmy.cn;
  error_log  /var/log/nginx/bird.cmysoft.fun-error.log notice;
  access_log  /var/log/nginx/bird.cmysoft.fun-access.log main;
  root /app/code/bird/;
  location / {
   index index.html;

}
2.4 location

server {
  listen 8099;
  charset UTF-8;
  server_name bird.cmy.cn;
  error_log  /var/log/nginx/bird.cmysoft.fun-error.log notice;
  access_log  /var/log/nginx/bird.cmysoft.fun-access.log main;
  root /app/code/bird/;
  location / {
   index index.html;

}
  location ~* \.(css|html|js)$ {
  expires 1d;
}
  location ~* \.(jpeg)$ {
  expires max;

}
}
2.5 kodbox
数据库
二进制安装mysql8.0


php
yum -y install php php-bcmath php-cli php-common php-devel php-embedded php-fpm php-gd php-intl php-mbstring php-mysqlnd php-opcache php-pdo php-process php-xml php-json
redis插件处理
wget https://pear.php.net/go-pear.phar
php go-pear.phar
pecl install redis
php --ini
php -m | grep redis
systemctl restart php-fpm

redis
wget https://download.redis.io/releases/redis-6.2.10.tar.gz
ll
cp redis-6.2.10.tar.gz /app/tools/
cd /app/tools/
ll
tar -xf redis-6.2.10.tar.gz
ln -s redis-6.2.10 redis
yum install -y gcc automake
ll
cd redis
make
vi /etc/profile
source /etc/profile
redis-server &


nginx
2.6 wordpress部署!!!
 groupadd -g9999 www
 useradd -s /sbin/nologin -M -u 9999 -g 9999 www

数据库
yum install     -y  mariadb-server
systemctl enable mariadb
systemctl start mariadb.service
mysql_secure_installation
mysql -uroot -p

create database wordpress;
grant all on wordpress.* to 'blog'@'10.168.10.%' identified by '1qaz';

ubt

create database wordpress;
CREATE USER 'blog'@'172.16.1.%' IDENTIFIED BY 'MyPass123!';
GRANT ALL PRIVILEGES ON wordpress.* TO 'blog'@'%';
FLUSH PRIVILEGES;
vim /etc/mysql/mysql.conf.d/mysqld.cnf
修改 `bind-address`,保存后重启MySQL即可
bind-address = 0.0.0.0
systemctl restart mysql

php
yum -y install php php-bcmath php-cli php-common php-devel php-embedded php-fpm php-gd php-intl php-mbstring php-mysqlnd php-opcache php-pdo php-process php-xml php-json
redis插件处理
wget https://pear.php.net/go-pear.phar
php go-pear.phar
pecl install redis
php --ini
php -m | grep redis
systemctl restart php-fpm


systemctl enable --now php-fpm.service
配置
cat /etc/php-fpm.d/www.conf |egrep -v '^;'|egrep -v '^$'
[www]
user = nginx
group = nginx
listen = 127.0.0.1:9000
systemctl reload php-fpm

ubt
apt-get install -y php8.1-cli php8.1-common php8.1-mysql php8.1-zip php8.1-gd php8.1-mbstring php8.1-curl php8.1-xml php8.1-bcmath php8.1-fpm

systemctl enable php8.1-fpm
vi /etc/php/8.1/fpm/pool.d/www.conf


nginx

cat blog.cmy.cn.conf
server {
    listen       80;
    server_name  blog.cmy.cn;
    root /app/code/blog/;
    location / {
        index  index.php;
    }
    location ~ \.php$ {
        fastcgi_pass   127.0.0.1:9000;
        fastcgi_index  index.php;
        fastcgi_param  SCRIPT_FILENAME  $document_root$fastcgi_script_name;
        include        fastcgi_params;
    }
}
2.7 nginx平滑升级
1. **备份当前 Nginx 二进制文件**


mv /sbin/nginx /sbin/nginx-1.26.1

- 将当前 Nginx 二进制文件重命名为 `nginx-1.26.1`,作为备份。

 2. **替换为新的 Nginx 二进制文件**  新的nginx文件来源于编译安装


mv nginx /sbin/nginx

- 将新的 Nginx 二进制文件移动到 `/sbin/nginx`,替换旧版本。


3. **检查新 Nginx 版本**

nginx -V

- 使用 `nginx -V` 命令检查新安装的 Nginx 版本和编译参数,确保替换成功。

4. **查看当前 Nginx 进程**


cat /var/run/nginx.pid
ps -ef | grep nginx

查看当前 Nginx 主进程的 PID(存储在 `/var/run/nginx.pid` 文件中)。

使用 `ps -ef | grep nginx` 查看所有 Nginx 进程。

5. **发送平滑升级信号**


kill -USR2 7972
ps -ef | grep nginx

- 向当前 Nginx 主进程(PID 为 7972)发送 `USR2` 信号,触发平滑升级。

- 升级后,新的 Nginx 进程会启动,而旧的 Nginx 进程仍然运行以处理现有连接。


 6. **检查新旧 Nginx 进程**


cat /var/run/nginx.pid
cat /var/run/nginx.pid.oldbin
2.8 nginx功能补充
认证功能


跳转功能

- **`return`**: 适用于简单的 URL 跳转。

- **`rewrite`**: 适用于复杂的 URL 重写,支持正则表达式。

- **`set`**: 用于创建或修改变量。

- **`if`**: 用于条件判断,结合变量实现动态逻辑。
2.9 nginx优化


# Nginx 跳转与优化详解


## 一、Nginx 跳转模块

### 1. `return` 指令
- **功能**:实现简单跳转(如 301/302 重定向)。
- **应用场景**:
  - 新旧域名跳转
  - HTTP → HTTPS 跳转
  - 临时维护页面(503)
- **配置示例**:
  nginx
  server {
      listen 80;
      server_name re.oldboylinux.cn;
      return 302 http://www.baidu.com$request_uri;
  }
2.9.1 rewrite 指令
- 功能:支持正则表达式匹配,实现复杂跳转(如伪静态)。
- 应用场景:
- 动态 URL 转换为静态 URL(伪静态)
- 路径重写(如
/product/123→/product?id=123)
- 配置示例:
location /product {
    rewrite ^/product/(\d+)$ /product?id=$1 last;
}
2.9.2 if 条件跳转
- 功能:结合变量和逻辑判断实现跳转。
- 常见应用:
- 维护模式开关(文件存在时返回 503)
- 限制请求方法(仅允许 GET/POST/HEAD)
- 内网 IP 放行
- 配置示例:
server {

    set $file "/etc/nginx/weihu.html";
    if ($remote_addr !~* 172.16.1.*) {
        set $flag 1;
    }
    if (-f $file) {
        set $flag ${flag}1;
    }
    if ($flag = 11) {
        return 503;
    }
}
2.9.3 安全优化
2.9.4 基础安全配置
- 隐藏版本号:
server_tokens off; - 限制请求方法:
if ($request_method !~* "GET|POST|HEAD") { return 405; } - 文件上传限制:
client_max_body_size 10m;
2.9.5 防爬虫与防盗链
- 防爬虫(黑名单):
if ($http_user_agent ~* "python|curl|wget|xxxbot") { return 403; } - 防盗链:
if ($http_referer !~* "baidu.com|google.com|^$") {
    return 403;
}
2.9.6 防 DDoS/CC 攻击
- 连接频率限制:
limit_conn_zone $binary_remote_addr zone=conn_zone:10m; limit_conn conn_zone 10; - 请求频率限制:
limit_req_zone $binary_remote_addr zone=req_zone:10m rate=1r/s;
limit_req zone=req_zone burst=5;
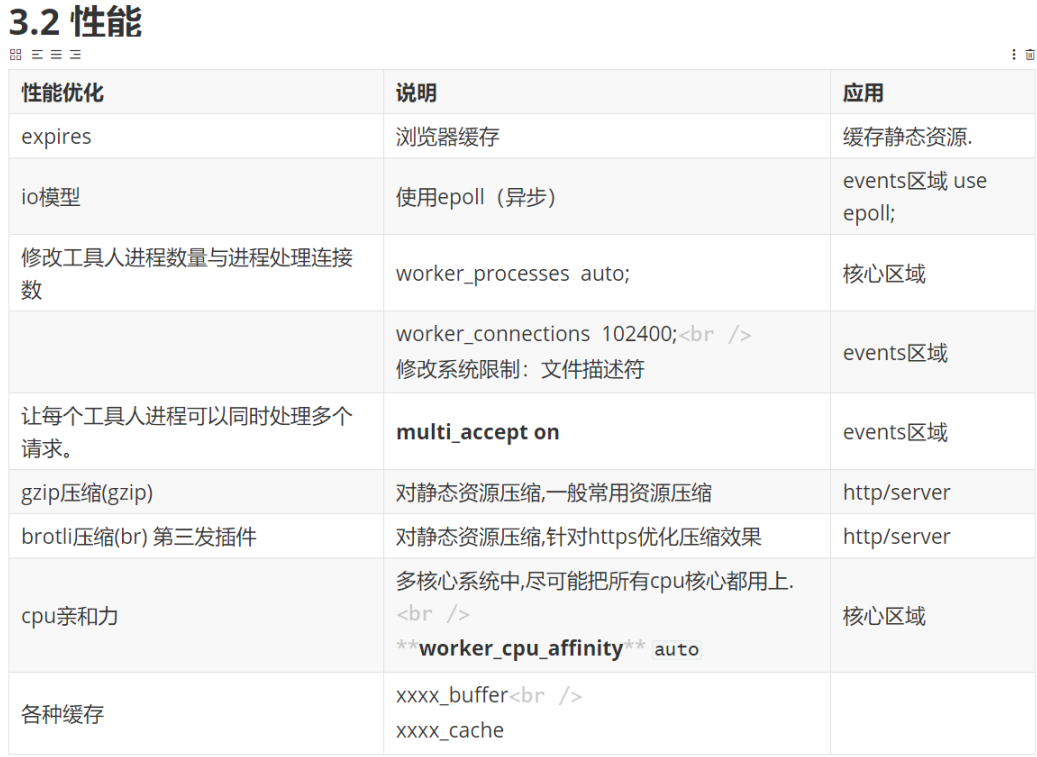
2.9.7 性能优化
2.9.8 基础性能配置
- Worker 进程优化:
worker_processes auto; events { worker_connections 10240; use epoll; multi_accept on; } - 文件描述符调整:
# 系统级配置
echo "* soft nofile 65535" >> /etc/security/limits.conf
echo "* hard nofile 65535" >> /etc/security/limits.conf
2.9.9 压缩与缓存
- Gzip 压缩:
gzip on; gzip_types text/plain text/css application/json application/javascript; gzip_min_length 1k; gzip_comp_level 6; - Brotli 压缩(需插件):
brotli on; brotli_types text/plain text/css application/json; - Proxy 缓存:
proxy_cache_path /dev/shm/ngx_cache levels=1:2 keys_zone=oldboy_cache:10m;
location / {
    proxy_cache oldboy_cache;
    proxy_cache_valid 200 302 1h;
}
2.9.10 高级优化
- CPU 亲和性:
worker_cpu_affinity auto; - 内核参数优化:
sendfile on;
tcp_nopush on;
tcp_nodelay on;
2.9.11 总结
| 模块 | 核心优化点 |
| -| |
| 跳转 | 灵活使用 return、rewrite 和 if 实现条件跳转 |
| 安全 | 隐藏版本号、限制请求、防爬虫、防盗链、频率限制 |
| 性能 | Worker 配置、压缩、缓存、CPU 亲和性、内核参数调整 |
| 工具 | 使用 ab 或专业工具(如 LoadRunner)进行压测验证优化效果 |
通过以上配置,可显著提升 Nginx 的稳定性、安全性和响应速度。建议根据实际场景选择性应用并定期测试优化效果。
3 负载均衡
3.1 介绍

3.2 配置
upstream lb_spool {
server 10.168.10.7:80;
server 10.168.10.8:80;

}
server{
   listen 80;
   server_name lb.cmysoft.cn;
   location / {
    proxy_pass http://lb_spool;
    proxy_set_header Host $http_host;
    proxy_set_header X-Forwarded-For $proxy_add_x_forwarded_for;
    proxy_set_header X-Real-Ip $remote_addr;
   }
}
#######################
proxy_set_header
修改负载均衡(代理)到后端节点的http请求头
proxy_set_header Host $http_host:
如果不加上,1b-->web请求头host信息不对,没有保留原有的域名,导致web服务使用默认站点处理,

使用xFF头记录用户真实的ip地址.访问日志中有$http_x_forwarded_for获取XFF信息.写入日志最后一列.

proxy_set_header X-Forwarded-For $proxy_add_x_forwarded_for;
未来代理一般不是1层,可能经过cdn,经过负载均衡最后到web服务,整个过程ip都记录下来追加的流程
3.3 用户访问流程!!!
web访问静态资源
 dns解析--域名 >lb ip上.

 三次握手与负载均衡+80端口建立连接. 发出http请求豹纹: GET + URI , Host头信息,UA.
 到达lb,80端口,http{},server{}区域多个server{},

 请求的Host信息与匹配80端口server的 server_name 匹配

 成功对应站点处理,失败默认或按顺序处理.

 location / proxy_pass转发,转发到对应的分组中或ip. proxy_pass的时候,带上Host头记录域名,XFF 头,XRI记录ip.

 lb-->web

 三次握手,与web+80端口. 发出http请求, GET + URI , Host头信息,UA,XFF 头,XRI记录ip. 与web服务器的nginx,http{} server匹配

 80端口的server中server_name 匹配匹配成功对应站点处理,失败默认或按顺序处理.
 对应的站点处理,静态站点目录+uri直接返回给用户.

 web >lb 请求web-->lb lb >用户用户拿到http响应.
处理动态资源
 用户-->lb dns解析--域名 >lb ip上. 三次握手与负载均衡+80端口建立连接. 发出http请求豹纹: GET/POST + URI , Host头信息,UA.
 到达lb,80端口,http{},server{}区域多个server{}, 请求的Host信息与匹配80端口server的 server_name 匹配成功对应站点处理,失败默认或按顺序处理.
 location / proxy_pass转发,转发到对应的分组中或 ip. proxy_pass的时候,带上Host头记录域名,XFF头,XRI 记录ip.
 lb-->web 三次握手,与web+80端口. 发出http请求, GET + URI , Host头信息,UA,XFF 头,XRI记录ip. 与web服务器的nginx,http{} server匹配
 80端口的server中server_name 匹配匹配成功对应站点处理,失败默认或按顺序处理.
 对应的站点处理转发给9000端口,带着php页面绝对路径(站点目录 +uri)
 php处理: 解析运行php文件.
 php-->ngx: 处理结果. web >lb 请求web-->lb lb >用户用户拿到http响应
3.4 负载均衡轮询算法

3.5 nginx 状态监控
-
stub_status_module:-
内置模块,用于监控 Nginx 的基本状态。
-
适合简单的实时监控需求。
-
-
upstream_check_module:-
第三方模块,用于监控上游服务器的健康状态。
-
适合负载均衡场景,确保后端服务器的可用性。
**upstream_check_module 编译安装后替换命令即可,注意备份
#nginx编译安装
-
wget https://tengine.taobao.org/download/tengine-3.1.0.tar.gz
tar -xf tengine-3.1.0.tar.gz
cd tengine-3.1.0
编译安装指定第三方包

./configure  --add-module=./modules/ngx_http_upstream_check_module/ --prefix=/etc/nginx --sbin-path=/usr/sbin/nginx --modules-path=/usr/lib64/nginx/modules --conf-path=/etc/nginx/nginx.conf --error-log-path=/var/log/nginx/error.log --http-log-path=/var/log/nginx/access.log --pid-path=/var/run/nginx.pid --lock-path=/var/run/nginx.lock --http-client-body-temp-path=/var/cache/nginx/client_temp --http-proxy-temp-path=/var/cache/nginx/proxy_temp --http-fastcgi-temp-path=/var/cache/nginx/fastcgi_temp --http-uwsgi-temp-path=/var/cache/nginx/uwsgi_temp --http-scgi-temp-path=/var/cache/nginx/scgi_temp --user=nginx --group=nginx --with-compat --with-file-aio --with-threads --with-http_addition_module --with-http_auth_request_module --with-http_dav_module --with-http_flv_module --with-http_gunzip_module --with-http_gzip_static_module --with-http_mp4_module --with-http_random_index_module --with-http_realip_module --with-http_secure_link_module --with-http_slice_module --with-http_ssl_module --with-http_stub_status_module --with-http_sub_module --with-http_v2_module --with-mail --with-mail_ssl_module --with-stream --with-stream_realip_module --with-stream_ssl_module --with-stream_ssl_preread_module --with-cc-opt='-O2 -g -pipe -Wall -Wp,-D_FORTIFY_SOURCE=2 -fexceptions -fstack-protector-strong --param=ssp-buffer-size=4 -grecord-gcc-switches -m64 -mtune=generic -fPIC' --with-ld-opt='-Wl,-z,relro -Wl,-z,now -pie'

make -j 2

./objs/nginx -V
这个nginx文件替换负载均衡服务器上的nginx即可
使用
blog.cmy.cn.conf
upstream lb_spool1 {
    server 10.168.10.7:80;
    server 10.168.10.8:80;
    server 10.168.10.9:80;
    check interval=3000 rise=2 fall=5 timeout=1000 type=http;
    check_http_send "HEAD / HTTP/1.1\r\nHost:blog.cmy.cn\r\n\r\n";
    check_http_expect_alive http_2xx http_3xx;
}

server {
    listen 80;
    server_name blog.cmy.cn;

    location / {
        proxy_pass http://lb_spool1;
        proxy_set_header Host $http_host;
        proxy_set_header X-Forwarded-For $proxy_add_x_forwarded_for;
        proxy_set_header X-Real-Ip $remote_addr;

    }

    location /blog_status {
        allow 10.168.10.0/24;
        allow 172.16.1.0/24;
        deny all;
        check_status;
    }
}
4 四层负载均衡
cat nginx.conf

user  www;
worker_processes  auto;

error_log  /var/log/nginx/error.log notice;
pid        /var/run/nginx.pid;


events {
    worker_connections  1024;
}

stream{


upstream lb_exam4 {
    hash $remote_addr consistent;
    server 10.168.10.7:8888;

    server 10.168.10.8:8888;
}
server{
    listen 8888;

    proxy_pass lb_exam4;

}
}


http {
    include       /etc/nginx/mime.types;
    default_type  application/octet-stream;
    log_format main '$remote_addr - $remote_user [$time_local] "$request" '
                      '$status $body_bytes_sent "$http_referer" '
                      '"$http_user_agent" "$http_x_forwarded_for" '
                      'upstream: $upstream_addr';

    access_log  /var/log/nginx/access.log  main;

    sendfile        on;
    #tcp_nopush     on;

    keepalive_timeout  65;

    #gzip  on;
    #server_tokens off;
    client_max_body_size 1000m;

    include /etc/nginx/conf.d/*.conf;
}
#service